 Toyota Land Cruiser Service ManualBody Mechanical » Windshield
Installation
Installation
1. CLEAN AND SHAPE CONTACT SURFACE OF BODY
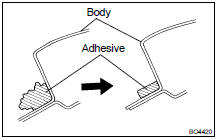
(a) Using a knife, cut away any rough areas on the body.
HINT: Leave as much adhesive on the body as possible.
(b) Clean the cutting surface of the adhesive with a piece of shop rag dampen with cleanser.
2. CLEAN REMOVED GLASS
(a) Remove the damaged stoppers and dams.
(b) Using a scraper, remove the adhesive sticking to the glass.
(c) Clean the glass with cleanser.
NOTICE:
- Do not touch the glass surface after cleaning it.
- Be careful not to damage the glass.
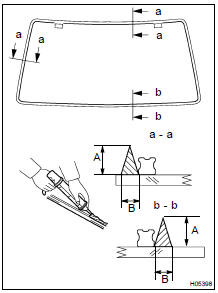
3. INSTALL NEW STOPPERS
Install new stoppers onto the glass.
A: 9 mm (0.35 in.)
B: 25 mm (0.98 in.)
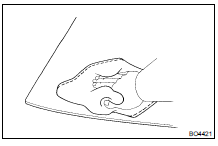
4. INSTALL NEW DAMS
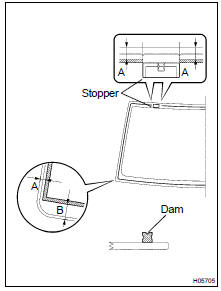
Install new dams with adhesive tape as shown in the illustration.
A: 7 mm (0.28 in.)
B: 20 mm (0.79 in.)
NOTICE: Do not touch the glass surface after cleaning it.
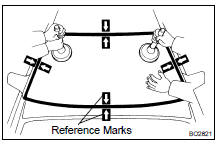
5. POSITION GLASS
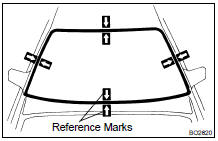
(a) Place the glass in the correct position.
(b) Check that all contacting parts of the glass rim are perfectly even.
(c) Place reference marks between the glass and the body.
(d) Remove the glass.
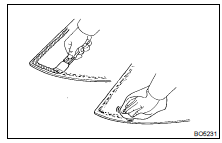
6. CLEAN CONTACT SURFACE OF GLASS
Using cleanser, clean the contact surface which is black-colored area around the entire glass rim.
NOTICE: Do not touch the glass surface after cleaning it.
7. COAT CONTACT SURFACE OF BODY WITH PRIMER "M"
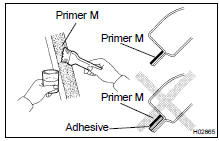
Using a brush, apply Primer M to the exposed part of the body on the vehicle side.
NOTICE:
- Let the primer coating dry for more than 3 minutes.
- Do not coat Primer M to the adhesive.
- Do not keep remaining Primer M for later use.
8. COAT CONTACT SURFACE OF GLASS WITH PRIMER "G"
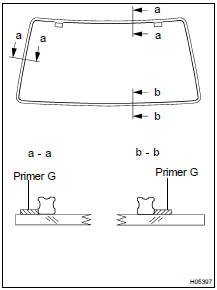
(a) Using a brush or sponge, coat the edge of the glass and the contact surface with Primer G.
(b) If the primer is coated wrongly to the area not specified by accident, wipe it off with a clean shop rag before the primer dries.
NOTICE:
- Let the primer coating dry for more than 3 minutes.
- Do not keep remaining Primer G for later use.
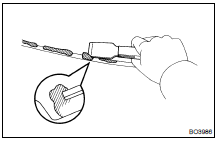
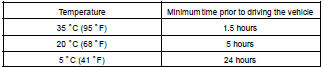
9. APPLY ADHESIVE
(a) Cut off the tip of the cartridge nozzle.
Part No.08850-00801 or equivalent.
HINT: After cutting off the tip, finish up all adhesive within the time described in the table below.

(b) Load the cartridge into the sealer gun.
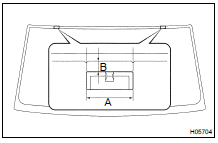
(c) Coat the glass with adhesive as shown.
A: 12.0 mm (0.472 in.) B: 8.0 mm (0.315 in.)
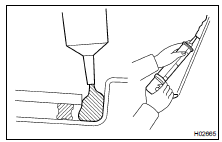
10. INSTALL WINDSHIELD GLASS
(a) Position the glass so that the reference marks are lined up, and press in gently along the rim.
(b) Using a spatula, apply adhesive on the glass rim.
(c) Use a scraper to remove any excess or protruding adhesive.
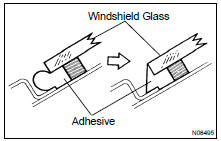
HINT: Make sure the dam is attached to the body panel, as shown in the illustration.
(d) Hold the windshield glass in place securely with a protective tape or equivalent until the adhesive hardens.
NOTICE: Take care not to drive the vehicle within the time described in the table below.
11. INSPECT FOR LEAK AND REPAIR
(a) Conduct a leak test after the adhesive dried completely.
(b) Seal any leak with sealant.
Part No. 08833-00030 or equivalent.
12. APPLY ADHESIVE TO MOULDING INSTALLATION AREA
Apply adhesive to the moulding installation area between the glass and the body.
Part No. 08833-00030 or equivalent.
13. INSTALL UPPER OUTSIDE MOULDING
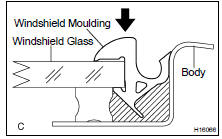
Place a new moulding onto the body and tap it by hand.
14. INSTALL OUTSIDE NO. 2 MOULDING
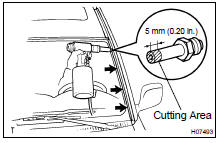
(a) Using an air riveter with nose piece No. 4, install 4 new rivets and the outside No. 2 moulding.
HINT: Before using the air riveter with nose piece No. 4, cut 5 mm (0.20 in.) from the edge of nose piece No. 4 as shown in the illustration.
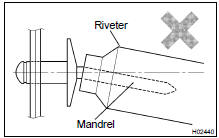
NOTICE:
- Do not prize a riveter. It could damage the riveter and cause loose fitting and mandrel bend.
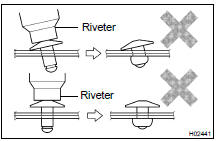
- Do not tilt the riveter when fasten the rivet to the material to avoid loose fitting.
- Do not allow gap spacing between the rivet head and the material.
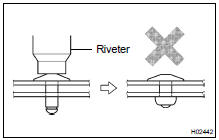
- Do not allow gap spacing between the materials.
(b) Use the same manner described above to the other side
15. INSTALL COWL TOP VENTILATOR LOUVERS
(a) Install the cowl top ventilator louver LH.
(b) Install the cowl top ventilator louver RH.
16. INSTALL HOOD TO COWL TOP SEAL
17. INSTALL WIPER ARMS
(a) Operate the wiper motor once and turn the wiper switch OFF.
(b) Install the wiper arms and tighten the nuts by hand.
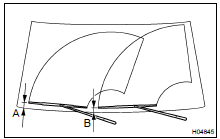
(c) Adjust the installation positions of the wiper arms to the positions as shown in the illustration.
A: Approx. 33 mm (1.30 in.) B: Approx. 21 mm (0.83 in.)
(d) Torque the nuts.
Torque: 20 N·m (204 kgf·cm, 15 ft·lbf)
(e) Install the 2 wiper arm head caps.
18. INSTALL INNER REAR VIEW MIRROR
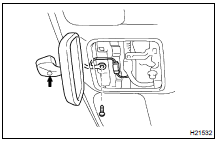
(a) Install the inner rear view mirror with the 2 screws.
(b) Connect the connector.
19. INSTALL FRONT SIDE OF ROOF HEADLINING
20. INSTALL ASSIST GRIPS
21. INSTALL OVERHEAD CONSOLE BOX
Connect the connector, then install the overhead console box with the bolt.
22. INSTALL HOLDER
Install the holders with the screws.
23. INSTALL DOUBLE VISOR
Install the double visors with the screws.
24. INSTALL SUN VISOR
(a) Install the sun visors with the screws, then connect the connectors.
(b) Install the caps.
25. INSTALL FRONT PILLAR GARNISH
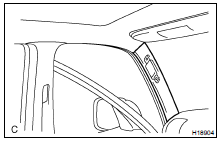
(a) Install the front pillar garnish.
(b) Use the same manner described above to the other side.
26. INSTALL FRONT ASSIST GRIP
(a) Install the front assist grip with the 2 screws, then install the 2 assist grip plugs.
(b) Use the same manner described above to the other side.
27. INSTALL FRONT DOOR OPENING TRIMS
Installation
Removal
Toyota Land Cruiser Service Manual
Categories
