 Toyota Land Cruiser Service ManualEngine Mechanical » Timing belt
Removal
Removal
1. REMOVE OIL PAN PROTECTOR
2. REMOVE ENGINE UNDER COVER
3. DRAIN ENGINE COOLANT
4. REMOVE BATTERY CLAMP COVER
5. REMOVE V-BANK COVER
(a) Remove the fuel return hose from the V-bank cover.
(b) Remove the 2 bolt, 2 cap nuts and V-bank cover.
6. REMOVE AIR CLEANER AND INTAKE AIR CONNECTOR ASSEMBLY
7. REMOVE DRIVE BELT, FAN, FLUID COUPLING AND FAN PULLEY
(a) Loosen the 4 nuts holding the fluid coupling to the fan bracket.
(b) Remove the generator drive belt.
( CH-7 )
(c) Remove the 4 nuts, the fan, the fluid coupling assembly
and the fan pulley.
8. REMOVE RADIATOR ASSEMBLY ( CO-17 )
9. REMOVE DRIVE BELT IDLER PULLEY
Remove the pulley bolt, the cover plate and the idler pulley.
10. REMOVE RH NO.3 TIMING BELT COVER
Remove the 3 bolts, the nut and the RH No.3 timing belt cover.
11. REMOVE LH NO.3 TIMING BELT COVER
(a) Disconnect the engine wire from the 2 wire clamps.
(b) Remove the 4 bolts and the nut.
(c) Disconnect the camshaft position sensor wire from the wire clamp on the LH No.3 timing belt cover.
(d) Disconnect the sensor connector from the connector bracket.
(e) Disconnect the camshaft position sensor connector.
(f) Remove the wire grommet from the LH No.3 timing belt cover.
(g) Remove the LH No.3 timing belt cover.
(h) Remove the oil cooler pipe and the 2 bolts.
12. REMOVE NO.2 TIMING BELT COVER
Remove the 2 bolts and the No.2 timing belt cover.
13. DISCONNECT A/C COMPRESSOR FROM ENGINE ( EM-77 )
14. REMOVE FAN BRACKET
Remove the 2 bolts, the 2 nuts and the fan bracket.
15. IF RE-USING TIMING BELT, CHECK INSTALLATION MARKS ON TIMING BELT

Check that there are 3 installation marks on the timing belt as turning the crankshaft pulley as shown in the illustration.
HINT: If the installation marks are disappeared, place a new installation mark on the timing belt before removing each part.
16. LOOSEN CRANKSHAFT PULLEY BOLT

Using SST, loosen the pulley bolt.
SST 09213-7001 1 (90105-70020), 09330-00021
17. SET NO.1 CYLINDER TO TDC/COMPRESSION
(a) Turn the crankshaft pulley and align its groove with the timing mark "0" of the No.1 timing belt cover.
(b) Check that the timing marks of the camshaft timing pulleys and that of the timing belt rear plates aligned.
If not, turn the crankshaft 1 revolution (360).
(c) Remove the crankshaft pulley bolt.
NOTICE: Do not turn the crankshaft pulley.
18. REMOVE TIMING BELT TENSIONER
HINT:
- When re-using timing belt: If the installation marks are disappeared, place 2 new installation marks on the timing belt to match the timing marks of the camshaft timing pulleys before the removal.
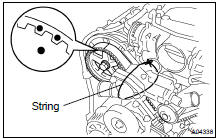
- When replacing timing belt tensioner only: To avoid meshing of the timing pulley and the timing belt, secure one of them with string, and then place matchmarks on the timing belt and the RH camshaft timing pulley.
Alternately loosen the 2 bolts, and remove the belt tensioner and the dust boot.
19. DISCONNECT TIMING BELT FROM CAMSHAFT TIMING PULLEYS
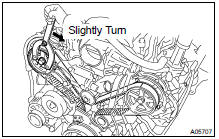
(a) Using SST, loosen the tension spring between the LH and RH camshaft timing pulleys by slightly turning the LH camshaft timing pulley clockwise.
SST 09960-10010 (09962-01000, 09963-01000)
(b) Disconnect the timing belt from the camshaft timing pulleys.
20. REMOVE CAMSHAFT TIMING PULLEYS
Using SST, remove the bolt and the timing pulley. Remove the 2 timing pulleys.
SST 09960-10010 (09962-01000, 09963-01000)
21. REMOVE GENERATOR ( CH-7 )
22. REMOVE DRIVE BELT TENSIONER
Remove the bolt, 2 nuts and the belt tensioner.
23. REMOVE CRANKSHAFT PULLEY
Using SST, remove the crankshaft pulley.
SST 09950-50013 (09951-05010, 09952-05010, 09953-05010, 09954-05011, 09953-05020, 09954-05021)
NOTICE: Do not turn the crankshaft pulley.
24. REMOVE NO.1 TIMING BELT COVER
Remove the 4 bolts and the timing belt cover.
25. REMOVE TIMING BELT GUIDE
26. REMOVE TIMING BELT COVER SPACER
27. REMOVE TIMING BELT
HINT: If re-using the belt and the installation mark is disappeared from it, place a new installation mark on the timing belt to the match the dot mark on the crankshaft timing pulley.
28. REMOVE NO.1 IDLER PULLEY AND NO.2 IDLER PULLEY
(a) Using a 10 mm hexagon wrench, remove the bolt, the No.1 idler pulley and the plate washer.
(b) Remove the bolt and the No.2 idler pulley.
29. REMOVE CRANKSHAFT TIMING PULLEY
Using SST, remove the timing pulley.
SST 09950-50013 (09951-05010, 09952-05010, 09953-05010, 09953-05020, 09954-05011, 09954-05021)
NOTICE: Do not turn the timing pulley.
Components
Inspection
Installation
Removal
Toyota Land Cruiser Service Manual
Categories
