 Toyota Land Cruiser Service ManualSteering » Tilt steering column
Removal
Removal
1. REMOVE STEERING WHEEL PAD
NOTICE: If the airbag connector is disconnected with the ignition switch at ON or ACC, DTCs will be recorded.

(a) Place the front wheels facing straight ahead.
(b) Remove the steering wheel lower No. 2 and No. 3 covers.
(c) Using a torx socket wrench, loosen the 2 torx screws.
HINT: Loosen the 2 screws until the groove along the screw circumference catches on the screw case.
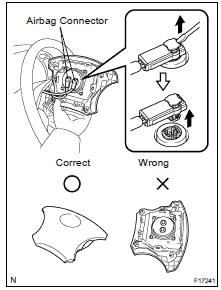
(d) Pull the pad out from the steering wheel and disconnect the 2 airbag connectors.
(e) Disconnect the connector.
CAUTION:
- When storing the wheel pad, keep the upper surface of the pad facing upward.
- Never disassemble the wheel pad.
NOTICE: When removing the wheel pad, take care not to pull the airbag wire harness.
2. REMOVE STEERING WHEEL
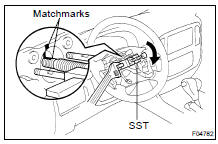
(a) Disconnect the connector.
(b) Remove the steering wheel set nut.
(c) Place matchmarks on the steering wheel and main shaft assembly.
(d) Using SST, remove the wheel.
SST 09950- 50013 (09951- 05010, 09952- 05010, 09953-05020, 09954-05021)
3. REMOVE UPPER AND LOWER COLUMN COVERS
Remove the 3 screws, upper and lower column covers.
4. REMOVE COMBINATION SWITCH WITH SPIRAL CABLE
(a) Tilt steering column: Disconnect the 3 connectors.
(b) w/ Power tilt and power telescopic steering column: Disconnect the 5 connectors.
(c) Disconnect the airbag connector.
(d) Remove the 3 screws and combination switch.
5. REMOVE SPIRAL CABLE ( BE-31 )
NOTICE: Do not disassembly the cable or apply oil to it.
6. REMOVE SCUFF PLATE
7. REMOVE COWL TRIM
Remove the clip and cowl trim.
8. REMOVE CLUSTER FINISH PANEL
Remove the connector and cluster finish panel.
9. REMOVE LOWER NO. 1 PANEL
(a) Remove the 2 screws and disconnect the hood lock release lever from the panel.
(b) Remove the 2 screws and disconnect the fuel lid release lever from the panel.
(c) Remove pad set screw and lower No. 1 panel.
10. REMOVE LH LOWER PANEL
Remove the 4 bolts and LH lower panel.
11. REMOVE NO. 2 HEATER TO REGISTER DUCT
Remove the screw and No. 2 heater to register duct.
12. DISCONNECT NO. 2 INTERMEDIATE SHAFT ASSEMBLY
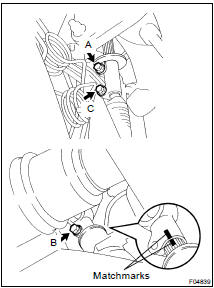
(a) Place matchmarks on the No. 2 intermediate shaft and control valve shaft.
(b) Loosen the bolt A.
(c) Remove the bolt B and the bolt C, disconnect the No. 2 intermediate shaft from the control valve shaft and sliding yoke.
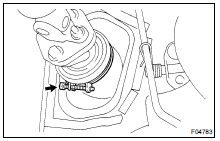
13. REMOVE NO. 2 INTERMEDIATE SHAFT ASSEMBLY
14. REMOVE HOLE COVER
Remove the 4 bolts and hole cover.
15. REMOVE STEERING COLUMN ASSEMBLY
(a) Disconnect the connectors.
(b) Loosen the hose clamp.
(c) Remove the 4 nuts and steering column assembly.
16. REMOVE SLIDING YOKE
(a) Remove the bolt A and sliding yoke.
(b) Remove the thrust stopper from the intermediate shaft assembly.
17. REMOVE HOSE CLAMP
18. REMOVE NO. 2 HOLE COVER
Disassembly
Inspection
Installation
Reassembly
Removal
Toyota Land Cruiser Service Manual
Categories
