 Toyota Land Cruiser Service ManualBody Mechanical » Instrument panel
Removal
Removal
1. w/ CD Changer Built In The Audio System: SHIP MODE SETTING
(a) Take out all of the CDs.
NOTICE: If they cannot be taken out, do not attempt to take out forcibly and send the unit for repair.
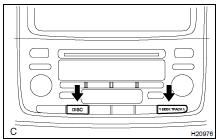
(b) Turn the ignition switch to ACC as pressing the "SEEK UP" and "DISC" switches at the same time.
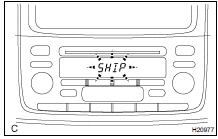
HINT: When the ship mode has been set, "SHIP" must be displayed.
(c) Turn the ignition switch to OFF and disconnect the battery negative cable.
NOTICE: Connecting the battery negative cable automatically end the ship mode.
2. REMOVE CENTER REGISTER

(a) Using a moulding remover, remove the center register.
(b) Disconnect the connector.
(c) Use the same manner described above to the other side.
3. REMOVE RADIO WITH A/C CONTROL ASSEMBLY
(a) Remove the 4 bolts.
(b) Disconnect the radio with A/C control assembly cable and remove the radio with A/C control assembly
4. w/ CD Changer Built In The Audio System: SHIP MODE CONFIRMATION
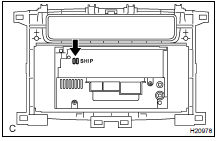
Check that a metal can be seen from holes marked "SHIP" on the back of the radio with A/C control assembly.
NOTICE: If a metal cannot be seen from a hole on the back of the radio with A/C control assembly, repeat "SHIP MODE".
5. REMOVE FRONT DOOR SCUFF PLATES
6. REMOVE COWL SIDE TRIMS
7. REMOVE FRONT DOOR OPENING TRIMS
8. REMOVE FRONT ASSIST GRIP
(a) Using a screwdriver, remove the assist grip plugs, then remove the 2 screws and assist grip.
HINT: Tape up the screwdriver tip before use.
(b) Use the same manner described above to the other side.
9. REMOVE FRONT PILLAR GARNISH
(a) Using a screwdriver, remove the front pillar garnish.
HINT: Tape up the screwdriver tip before use.
(b) Use the same manner described above to the other side.
10. REMOVE STEERING WHEEL ( SR-14 or SR-29 )
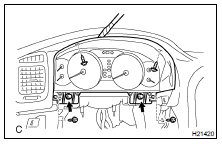
11. REMOVE CLUSTER FINISH PANEL
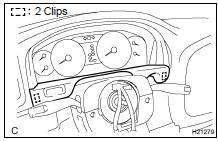
Using a screwdriver, remove the cluster finish panel, then disconnect the connector.
HINT: Tape up the screwdriver tip before use.
12. REMOVE HOOD LOCK CONTROL CABLE LEVER AND FUEL LID CONTROL CABLE LEVER
(a) Remove the 2 screws and the hood lock control cable lever.
(b) Remove the 2 screws and the fuel lid control cable lever.
13. REMOVE LOWER NO. 1 PANEL
(a) Remove the screw.
(b) Using a screwdriver, remove the lower No. 1 panel, then disconnect the connectors.
HINT: Tape up the screwdriver tip before use.
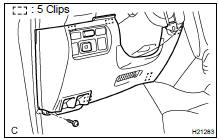
14. REMOVE LH LOWER PANEL
Remove the 3 bolts and the LH lower panel.
15. REMOVE COLUMN COVERS
Remove the 3 screws and the column covers.
16. REMOVE COMBINATION SWITCH
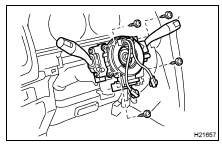
(a) Disconnect the connectors.
(b) Remove the clamp..
(c) Remove the 4 screws and the combination switch.
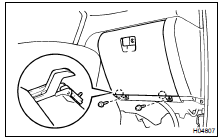
17. REMOVE NO. 2 HEATER TO REGISTER DUCT
Remove the screw and the No. 2 heater to register duct as shown in the illustration.
18. REMOVE STEERING COLUMN ( SR-14 or SR-29 )
19. REMOVE COMBINATION METER
(a) Disconnect the connectors.
HINT: The connectors can be disconnected by loosening the bolts.
(b) Remove the 4 screws.
(c) Using a screwdriver, remove the combination meter.
HINT: Tape up the screwdriver tip before use.
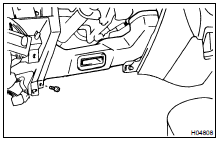
20. REMOVE GLOVE COMPARTMENT DOOR
(a) Remove the 2 screws.
(b) Remove the glove compartment door, then disconnect the glove compartment door damper clip.
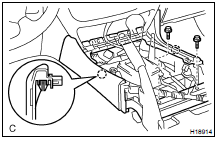
21. DISCONNECT AIRBAG CONNECTOR ( RS-31 )
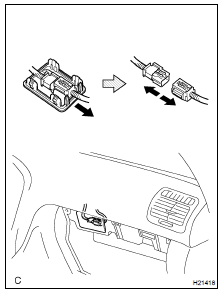
(a) Using a screwdriver, remove the No. 1 under cover.
HINT: Tape up the screwdriver tip before use.
(b) Slide the airbag connector to pull out from the No. 1 under cover.
(c) Disconnect the airbag connector.
NOTICE: When handling the airbag connector, take care not to damage the airbag wire harness.
22. REMOVE LOWER NO. 2 PANEL
Remove the 3 screws and the lower No. 2 panel.
23. REMOVE FRONT CONSOLE PANEL

(a) Remove the transfer shift lever knob.
(b) Using a screwdriver, remove the front console panel.
HINT: Tape up the screwdriver tip before use.
24. REMOVE CONSOLE REAR END PANEL
(a) Remove the rear console cup holder box.
(b) Remove the 2 screws.
(c) Using a screwdriver, remove the console rear end panel.
HINT: Tape up the screwdriver tip before use.
25. REMOVE REAR RADIO CONTROL PANEL
Disconnect the connector, then remove the 3 screws and the rear radio control panel.
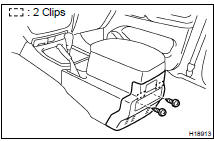
26. REMOVE REAR CONSOLE BOX
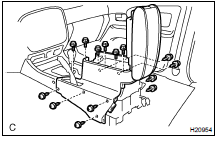
(a) w/o Disc player changer : Remove the 6 bolts, the 8 screws and the rear console box.
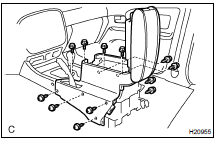
(b) w/ Disc player changer : Remove the 4 bolts, the 8 screws and the rear console box.
27. REMOVE CENTER LOWER CLUSTER FINISH PANEL
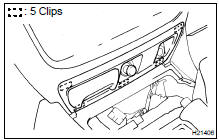
Using a screwdriver, remove the center lower cluster finish panel, then disconnect the connector.
HINT: Tape up the screwdriver tip before use.
28. REMOVE FRONT CONSOLE BOX AND FRONT CONSOLE BOX BRACKET
Remove the 2 bolts, the front console box and the front console box bracket.
29. REMOVE INSTRUMENT PANEL
(a) Disconnect the junction connectors.
HINT: The connectors can be disconnected by loosening the bolts.
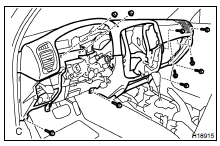
(b) Disconnect the connector, then remove the 8 bolts, the 2 nuts and the instrument panel.
30. REMOVE ECM ( SF-60 )
31. REMOVE NO. 3 HEATER TO REGISTER DUCT
32. REMOVE NO. 4 HEATER TO REGISTER DUCT
33. REMOVE GLOVE COMPARTMENT DOOR DAMPER
34. REMOVE FLOOR BRACE
35. REMOVE NO. 1 BRACE
36. REMOVE REINFORCEMENT
Components
Disassembly
Installation
Removal
Toyota Land Cruiser Service Manual
Categories
