 Toyota Land Cruiser Service ManualAir conditioning » Air conditioning system
On-vehicle inspection
On-vehicle inspection
1. INSPECT REFRIGERANT VOLUME
Observe the sight glass on the liquid tube.
Test conditions:
- Engine speed at 1,500 rpm
- Fan speed selector at "HI" position
- A/C switch ON
- Temperature control dial at "COOL" position
- Doors fully opened
|
Item |
Symptom |
Amount of refrigerant |
Remedy |
| 1 | Bubbles appear in sight glass | Insufficient* | (1) Check for gas leakage with gas leak detector and repair, if necessary (2) Add refrigerant until bubbles disappear |
| 2 | No bubbles appear in sight glass | None, sufficient or too much | Refer to item 3 and 4 |
| 3 | No temperature difference between compressor inlet and outlet | Empty or nearly empty | (1) Check for gas leakage with gas leak detector and repair, if necessary (2) Add refrigerant until bubbles disappear |
| 4 | Temperature between compressor inlet and outlet is noticeably different | Correct or too much | Refer to items 5 and 6 |
| 5 | Immediately after air conditioning system is turned off, refrigerant in sight glass stays clear | Too much | (1) Discharge refrigerant (2) Evacuate air and charge proper amount of purified refrigerant |
| 6 | When air conditioning system is turned off, refrigerant foams and then stays clear | Correct |
*: Bubbles in the sight glass with ambient temperatures higher than usual can be considered normal if cooling is sufficient.
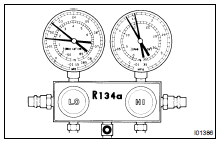
2. INSPECT REFRIGERANT PRESSURE WITH MANIFOLD GAUGE SET
Check the trouble area using a set of manifold gauge set. Read the manifold gauge pressure when following conditions are detected.
Test conditions:
- Temperature at the air inlet with the switch set
- at RECIRC is 30 - 35 C (86 - 95 F)
- Engine running at 2,000 rpm
- Fan speed selector at "HI" position
- Temperature control dial on "COOL" position
HINT: It should be noted that the gauge indications may vary depending on ambient temperature conditions.
- Normally functioning refrigeration system.
Gauge reading: Low pressure side: 0.15 - 0.25 MPa (1.5 - 2.5 kgf/cm2) High pressure side: 1.37 - 1.57 MPa (14 - 15 kgf/cm2)
- Moisture present in refrigeration system.
|
Symptom seen in refrigeration system |
Probable cause |
Diagnosis |
Remedy |
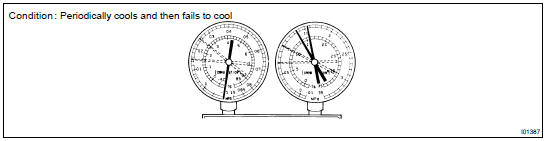
| During operation, pressure on low pressure side sometimes become a vacuum and sometime normal | Moisture entered in refrigeration system freezes at expansion valve orifice and temporarily stops cycle, but normal state is restored after a time when the ice melts |
|
|
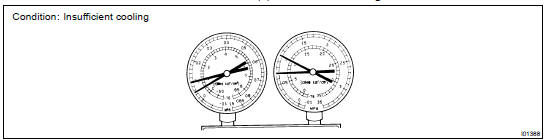
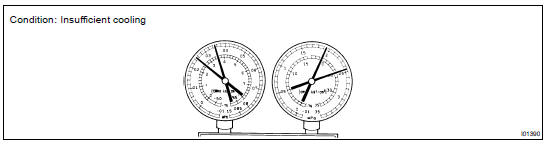
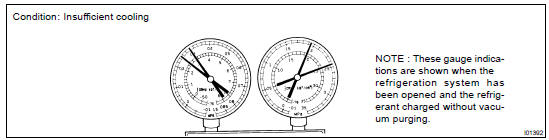
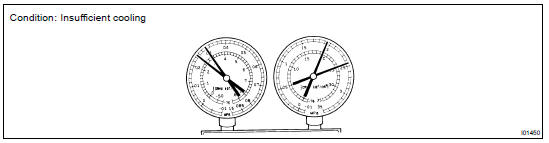
- Insufficient cooling
|
Symptom seen in refrigeration system |
Probable cause |
Diagnosis |
Remedy |
|
Gas leakage at some place in refrigeration system |
|
|
- Poor circulation of refrigerant

|
Symptom seen in refrigeration system |
Probable cause |
Diagnosis |
Remedy |
|
Refrigerant flow obstructed by dirt in condenser | condenser clogged | Replace condenser |
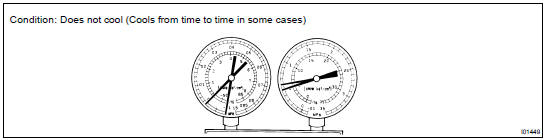
- Refrigerant does not circulate
|
Symptom seen in refrigeration system |
Probable cause |
Diagnosis |
Remedy |
|
|
Refrigerant does not circulate |
|
- Refrigerant overcharged or insufficient cooling of condenser.
|
Symptom seen in refrigeration system |
Probable cause |
Diagnosis |
Remedy |
|
|
|
|
- Air present in refrigeration system
|
Symptom seen in refrigeration system |
Probable cause |
Diagnosis |
Remedy |
|
Air entered in refrigeration system |
|
|
- Expansion valve improperly
|
Symptom seen in refrigeration system |
Probable cause |
Diagnosis |
Remedy |
|
Trouble in expansion valve |
|
Check expansion valve, and replace if defective |
- Defective compression compressor
|
Symptom seen in refrigeration system |
Probable cause |
Diagnosis |
Remedy |
|
Internal leak in compressor |
|
Repair or replace compressor |
3. INSPECT IDLE-UP SPEED
(a) Warm up engine (b) Inspect idle-up speed when following conditions are established.
Test conditions:
- Fan speed selector at "HI" position
- Temperature control dial at "COOL" position
- A/C switch ON
- Put gear shift in neutral
|
Magnetic clutch condition |
Idle-up speed |
| Magnetic clutch not engaged | 700 +- 50 rpm |
| Magnetic clutch engaged | 780 +- 50 rpm |
If idle speed is not as specified, check the idle control system.
4. INSPECT FOR LEAKAGE OF REFRIGERANT
(a) Stop engine.
(b) Secure good ventilation (The gas leak detector may not react to volatile gases which are not refrigerant, such as evaporated gasoline and exhaust gas) (c) Repeat the test 2 or 3 times (d) Make sure that there is some refrigerant remaining in the refrigeration system.
When compressor is OFF: approx. 392 - 588 kPa (4 - 6 kgf·cm2, 57 - 85 psi)
(e) Bring the gas leak detector close to the drain hose before performing the test.
HINT:
- After the blower motor stops, leave the cooling for more than 15 minutes.
- Expose the gas leak detector sensor under the drain hose.
- When bring the gas leak detector close to the drain hose, make sure that the gas leak detector does not react to the volatile gases.
If gas leaks are detected, lift up the vehicle.
(f) If gas leaks are not detected on the drain hose, remove the blower resistor from the cooling unit. Then insert the gas leak detector sensor into the unit to perform the test.
(g) Disconnect the connector and leave the pressure switch for approx. 20 minutes. Then bring the gas leak detector close to the pressure switch to perform the test.
(h) Bring the gas leak detector close to the refrigerant lines.
Charging
Evacuating
On-vehicle inspection
Precaution
Toyota Land Cruiser Service Manual
Categories
