 Toyota Land Cruiser Service ManualEngine Mechanical » Disassembly
Replacement
Replacement
1. REPLACE OVERSIZED (O/S) PISTONS FOR CYLINDER BORING
HINT:
- Bore all the 8 cylinders to the oversized piston outside diameter.
- Replace all the piston rings with the ones to match the oversized pistons.
(a) Keep 8 new O/S pistons.
O/S 0.50 piston diameter: 94.402 - 94.430 mm (3.7166 - 3.7177 in.)
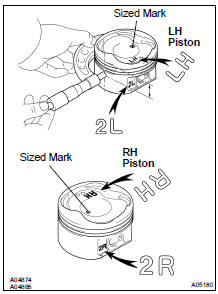
HINT: The shape of the piston varies for the LH and RH banks. The LH piston is marked with "LH" and "2L", the RH piston with "RH" and "2R".
(b) Using a micrometer, measure the piston diameter at right angles to the piston pin center line, 30.75 mm (1.2106 in.) from the piston head.
(c) Calculate the amount for each cylinder to be rebored as follows:
Size to be rebored = P + C - H
P = Piston diameter
C = Piston clearance:
0.090 - 0.111 mm (0.0035 - 0.0044 in.)
H = Allowance for honing: 0.02 mm (0.0008 in.) or less (d) Bore and hone the cylinders to calculated dimensions.
Maximum honing: 0.02 mm (0.0008 in.)
NOTICE: Excess honing will destroy the finished roundness.
2. REPLACE CONNECTING ROD BUSHINGS
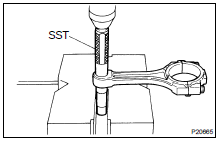
(a) Using SST and a press, press out the bushing.
SST 09222-30010
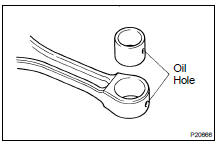
(b) Align the oil holes of a new bushing and the connecting rod.
(c) Using SST and a press, press in the bushing.
SST 09222-30010
(d) Using a pin hole grinder, hone the bushing to obtain the standard specified clearance ( EM-97 ) between the bushing and piston pin.
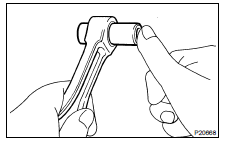
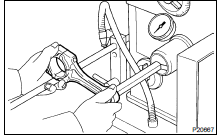
(e) Check the piston pin fit at normal room temperature. Coat the piston pin with engine oil, and push it into the connecting rod with your thumb.
3. REPLACE CRANKSHAFT FRONT OIL SEAL
HINT: There are 2 methods ((a) and (b)) to replace the oil seal.
(a) If the oil pump is removed from the cylinder block:
- Using a screwdriver, pry out the oil seal.
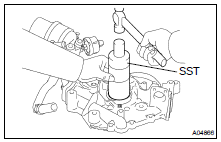
- Using SST and a hammer, tap in a new oil seal until its surface is flush with the oil pump body edge.
SST 09316-6001 1 (09316-00011)
- Apply MP grease to the oil seal lip.
(b) If the oil pump is installed to the cylinder block:
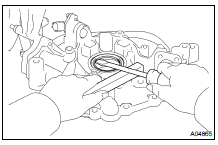
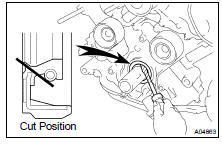
- Using a knife, cut off the oil seal lip.
- Using a screwdriver, pry out the oil seal.
NOTICE: Be careful not to damage the crankshaft. Tape up the screwdriver tip.
- Apply MP grease to a new oil seal lip.
- Using SST and a hammer, tap in the oil seal until its surface is flush with the oil pump body edge.
SST 09316-6001 1 (09316-00011)
4. REPLACE CRANKSHAFT REAR OIL SEAL

HINT: There are 2 methods ((a) and (b)) to replace the oil seal.
(a) If the rear oil seal retainer is removed from the cylinder block:
- Using a screwdriver and hammer, tap out the oil seal.
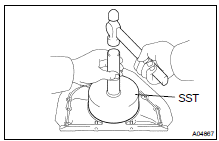
- Using SST and a hammer, tap in a new oil seal until its surface is flush with the rear oil seal retainer edge.
SST 09223-56010
- Apply MP grease to the oil seal lip.
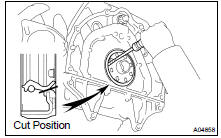
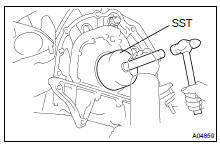
(b) If the rear oil seal retainer is installed to the cylinder block:
- Using a knife, cut off the oil seal lip.
- Using a screwdriver, pry out the oil seal.
NOTICE: Be careful not to damage the crankshaft. Tape up the screwdriver tip.
- Apply MP grease to a new oil seal lip.
- Using SST and a hammer, tap in the oil seal until its surface is flush with the rear oil seal retainer edge.
SST 09223-56010
Inspection
Reassembly
Replacement
Toyota Land Cruiser Service Manual
Categories
