 Toyota Land Cruiser Service ManualCooling » Radiator
Removal
Removal
1. REMOVE ENGINE UNDER COVER NO.1
2. DRAIN ENGINE COOLANT
3. DISCONNECT RADIATOR UPPER HOSE FROM RADIATOR
4. DISCONNECT RADIATOR LOWER HOSE FROM RADIATOR
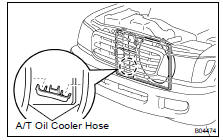
5. DISCONNECT A/T OIL COOLER HOSES FROM RADIATOR
6. REMOVE RADIATOR RESERVOIR
(a) Disconnect the clamp on the wire from the radiator.
(b) Disconnect the resorvoir hose from the radiator.
(c) Remove the 2 bolts, resorvoir and grommet.
7. REMOVE RADIATOR ASSEMBLY
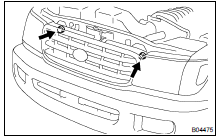
(a) Remove the 2 nuts, and disconnect the 2 clamps on the A/C discharge tube from the bracket.
(b) Remove the 2 bolts, and disconnect the 2 brackets on the wire from the radiator.
(c) Disconnect the A/T oil cooler hoses from the clamp on the fan shroud.
(d) Loosen the fan pulley mounting nuts holding the fluid coupling to the fan bracket.
(e) Remove generator drive belt. (CH-7 ) (f) Remove the 3 bolts holding the fan shroud to the radiator.
(g) Remove the 4 fan pulley mounting nuts.
(h) Pull out the fan with fluid coupling, fan pulley and fan shroud.
(i) Remove the 2 nuts.
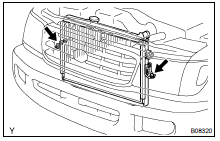
(j) Remove the 2 bolts.
(k) Lift out the radiator assembly.
8. REMOVE RADIATOR SIDE SUPPORTS FROM RADIATOR
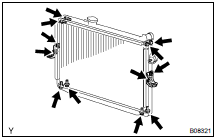
(a) Remove the 4 nuts and 2 brackets.
(b) Remove the 8 nuts and 2 side supports.
Installation
On-vehicle cleaning
On-vehicle inspection]
Removal
Toyota Land Cruiser Service Manual
Categories
