 Toyota Land Cruiser Service ManualSuspension & Axle » Front drive shaft
Removal
Removal
1. REMOVE FRONT WHEEL
Torque: 131 N·m (1,340 kgf·cm, 97 ft·lbf)
2. REMOVE BRAKE CALIPER
(a) Remove the bolt and disconnect the flexible hose from the steering knuckle.
Torque: 28 N·m (290 kgf·cm, 21 ft·lbf)
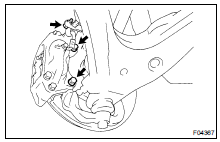
(b) Remove the 2 bolts, washers and brake caliper.
Torque: 123 N·m (1,250 kgf·cm, 91 ft·lbf)
(c) Support the brake caliper securely.
3. REMOVE SNAP RING
(a) Using a screwdriver and hammer, remove the grease cap from the flange.
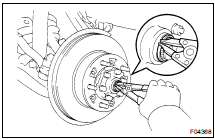
(b) Using snap ring pliers, remove the snap ring.
4. DISCONNECT ABS SPEED SENSOR AND WIRE HARNESS
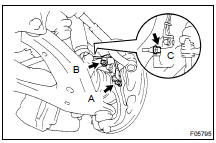
Remove the 3 bolts and disconnect the ABS speed sensor and wire harness.
Torque: A: 8.0 N·m (82 kgf·cm, 71 in.·lbf) B: 13 N·m (130 kgf·cm, 10 ft·lbf) C: 28 N·m (290 kgf·cm, 21 ft·lbf)
5. DISCONNECT STEERING KNUCKLE ARM
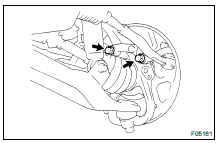
Remove the 2 bolts and disconnect the steering knuckle arm.
Torque: 147 N·m (1,500 kgf·cm, 108 ft·lbf)
HINT:
- At the time of installation, please refer to the following items.
Clean the threads of the 2 bolts and steering knuckle with toluene or trichloroethylene.
- Apply sealant to the 2 bolt threads.
Sealant: Part No. 08833-00070, THREE BOND 1324 or equivalent
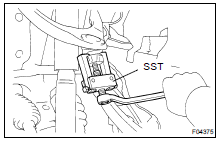
6. DISCONNECT STEERING KNUCKLE FROM LOWER SUSPENSION ARM
(a) Remove the cotter pin and nut.
Torque: 159 N·m (1,625 kgf·cm, 117 ft·lbf)
HINT: At the time of installation, if the holes for the cotter pin are not aligned, tighten the nut further up to 60.

(b) Using SST, disconnect the steering knuckle from the lower suspension arm.
SST 09628-6201 1
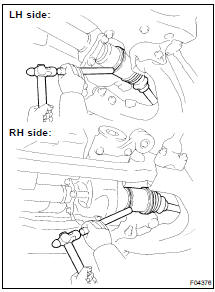
7. REMOVE STEERING KNUCKLE WITH AXLE HUB
(a) Temporarily install the nut to the lower suspension arm.
(b) Support the lower suspension arm with a jack.
(c) Remove the cotter pin and nut.
Torque: 110 N·m (1,125 kgf·cm, 81 ft·lbf)
HINT: At the time of installation, if the holes for the cotter pin are not aligned, tighten the nut further up to 60.
(d) Using SST, disconnect the steering knuckle from the upper suspension arm.
SST 09628-6201 1
(e) Remove the nut and steering knuckle with axle hub.
8. REMOVE DRIVE SHAFT
(a) Using a brass bar and hammer, remove the drive shaft.
NOTICE: Be careful not to damage the boot, dust cover and oil seal.
(b) Using a screwdriver, remove the snap ring from the inboard joint tulip.
HINT: At the time of installation, please refer to the following items.
- Coat the oil seal lip with MP grease.
- Before installation, set a new snap ring with opening side facing downward.
- After installation, check that the drive shaft cannot be pulled out by hand.
Disassembly
Reassembly
Removal
Toyota Land Cruiser Service Manual
Categories
