 Toyota Land Cruiser Service ManualAutomatic Transmission » Automatic transmission unit
Removal
Removal
1. REMOVE BATTERY
2. REMOVE AIR CLEANER CAP DRIVE BELT, FAN AND FLUID COUPLING ASSEMBLY, FAN SHROUD AND RADIATOR RESERVOIR ( CO-17 )
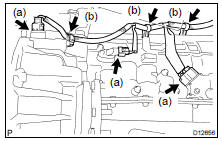
3. DISCONNECT CONNECTORS
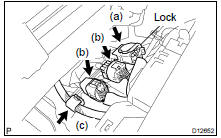
(a) Release the lock and disconnect the transmission wire connector.
(b) Disconnect the 2 transmission wire connectors.
(c) Separate the connector clamp.
4. REMOVE TRANSFER SHIFT LEVER BOOT
(a) Remove the transfer shift lever knob.
(b) Remove upper console panel ( BO-84 ).
(c) Remove the 4 bolts and the transfer shift lever boot.
Torque: 5.4 N·m (55 kgf·cm, 48 in.·lbf)
5. REMOVE ENGINE NO. 1 AND NO. 2 UNDER COVERS
6. REMOVE LH AND RH FRONT EXHAUST PIPES ( EM-1 15)
7. REMOVE FRONT AND REAR PROPELLER SHAFTS ( PR-4 )
8. SEPARATE TRANSMISSION SHIFT CONTROL ROD
Remove the clip and pin and separate the shift control rod.
9. SEPARATE TRANSFER SHIFT LEVER
Remove the nut and separate the transfer shift lever rod assembly.
Torque: 12 N·m (122 kgf·cm, 9 ft·lbf)
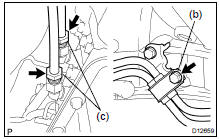
10. SEPARATE WIRE HARNESS
(a) Disconnect 3 connectors.
(b) Remove the 3 clamps from the transmission unit and separate the transmission wire.
11. REMOVE TORQUE CONVERTER CLUTCH MOUNTING BOLT
(a) Remove the bolt and the hole plug.
Torque: 18 N·m (185 kgf·cm, 13 ft·lbf)
(b) Turn the crankshaft to gain access to each bolt.
(c) Hold the crankshaft pulley nut with a wrench, and remove the 6 bolts.
Torque: 48 N·m (490 kgf·cm, 35 ft·lbf)
HINT: At the time of installation, first install the green colored bolt. And then install the other 5 bolts.
12. DISCONNECT OIL COOLER PIPES
(a) Loosen the 2 union nuts.
(b) Remove the bolt and the clamp.
Torque: 12 N·m (122 kgf·cm, 9 ft·lbf)
(c) Remove the 2 union nuts and disconnect the 2 oil cooler pipes.
Torque: 34 ·m (347 kgf·cm, 25 ft·lbf)
13. SEPARATE GROUND CABLE
Remove the bolt and separate the ground cable.
Torque: 20 N·m (204 kgf·cm, 15 ft·lbf)
14. REMOVE CROSSMEMBER AND TRANSTER CASE PROTECTOR
(a) Support the transmission with a jack.
(b) Remove the 3 bolts and the transter case protector.
Torque: 29 N·m (296 kgf·cm, 21 ft·lbf)
(c) Remove the 8 bolts, the 2 nuts and the crossmember.
Torque:
Bolt: 50 N·m (510 kgf·cm, 37 ft·lbf)
Nut: 74 N·m (750 kgf·cm, 54 ft·lbf)
15. REMOVE ENGINE MOUNTING INSULATOR RR
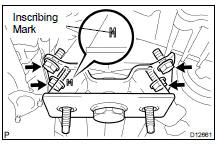
Remove the 4 bolts and the engine mounting insulator RR.
Torque: 59 N·m (600 kgf·cm, 43 ft·lbf)
HINT: At the time of installation, install the insulator rear with the inscribing mark facing backward.
16. REMOVE TRANSMISSION
(a) Lower the rear end of the transmission unit.
(b) Remove the transmission wire clamp bolt.
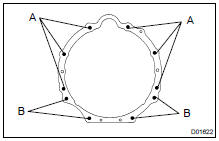
(c) Remove the 10 bolts and the transmission unit.
Torque:
Bolt A: 71 N·m (724 kgf·cm, 52 ft·lbf)
Bolt B: 37 N·m (377 kgf·cm, 27 ft·lbf)
17. REMOVE WIRE HARNESS AND HOSE
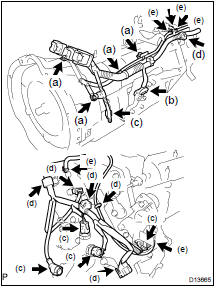
(a) Remove the 4 bolts.
Torque: 8.0 N·m (82 kgf·cm, 71 in.·lbf)
(b) Release the lock and disconnect the connector.
(c) Disconnect the 5 connectors.
(d) Separate the 6 connector clamps.
(e) Disconnect the 5 hoses and remove the wire harness and the hose.
Installation
Removal
Toyota Land Cruiser Service Manual
Categories
