 Toyota Land Cruiser Service ManualIntroduction » Repair instructions
General information
General information
BASIC REPAIR HINT
(a) Use fender, seat and floor covers to keep the vehicle clean and prevent damage.
(b) During disassembly, keep parts in the appropriate order to facilitate reassembly.
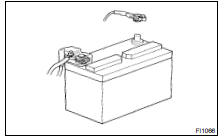
(c) Installation and removal of battery terminal:
- Before performing electrical work, disconnect the negative (-) terminal cable from the battery.
- If it is necessary to disconnect the battery for inspection or repair, first disconnect the negative (-) terminal cable.
- When disconnecting the terminal cable to prevent damage to battery terminal, loosen the cable nut and raise the cable straight up without twisting or prying it.
- Clean the battery terminals and cable ends with a clean shop rag. Do not scrape them with a file or other abrasive objects.
- Install the cable ends to the battery terminals after
loosening the nut, and tighten the nut after installation.
Do not use a hammer to tap the cable ends onto the terminals.
- Be sure the cover for the positive (+) terminal is properly in place.
(d) Check hose and wiring connectors to make sure that they are connected securely and correctly.
(e) Non-reusable parts
- Always replace cotter pins, gaskets, O-rings and oil seals, etc. with new ones.
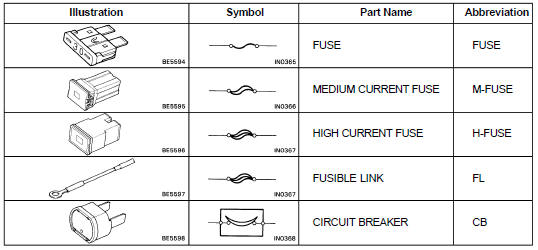
- Non-reusable parts are indicated in the component illustrations by the " " symbol.
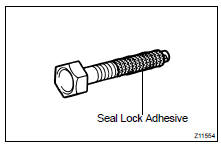
(f) Precoated parts Precoated parts are bolts and nuts, etc. that are coated with a seal lock adhesive at the factory.
- If a precoated part is retightened, loosened or caused to move in any way, it must be recoated with the specified adhesive.
- When reusing precoated parts, clean off the old adhesive and dry with compressed air. Then apply the specified seal lock adhesive to the bolt, nut or threads.
- Precoated parts are indicated in the component illustrations by the " " symbol.
(g) When necessary, use a sealer on gaskets to prevent leaks.
(h) Carefully observe all specifications for bolt tightening torques. Always use a torque wrench.
(i) Use of special service tools (SST) and special service materials (SSM) may be required, depending on the nature of the repair. Be sure to use SST and SSM where specified and follow the proper work procedure. A list of SST and SSM can be found in Preparation section in this manual.
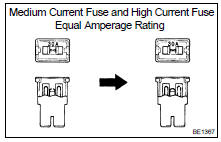
(j) When replacing fuses, be sure the new fuse has the correct amperage rating. DO NOT exceed the rating or use one with a lower rating.
(k) Care must be taken when jacking up and supporting the vehicle. Be sure to lift and support the vehicle at the proper locations ( IN-8 ).
- Cancel the parking brake on the level place and shift the transmission in N position.
- When jacking up the front wheels of the vehicle at first place stoppers behind the rear wheels.
- When jacking up the rear wheels of the vehicle at first place stoppers before the front wheels.
- When either the front or rear wheels only should be jacked up, set rigid racks and place stoppers in front and behind the other wheels on the ground.
- After the vehicle is jacked up, be sure to support it on rigid racks. It is extremely dangerous to do any work on a vehicle raised on a jack alone, even for a small job that can be finished quickly.
(l) Observe the following precautions to avoid damage to the following parts:
- Do not open the cover or case of the ECU unless absolutely necessary. (If the IC terminals are touched, the IC may be destroyed by static electricity.)
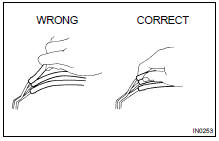
- To disconnect vacuum hoses, pull off the end, not the middle of the hose.
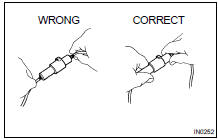
- To pull apart electrical connectors, pull on the connector itself, not the wires.
- Be careful not to drop electrical components, such as sensors or relays. If they are dropped on a hard floor, they should be replaced and not reused.
- When steam cleaning an engine, protect the electronic components, air filter and emission-related components from water.
- Never use an impact wrench to remove or install temperature switches or temperature sensors.
- When checking continuity at the wire connector, insert the tester probe carefully to prevent terminals from bending.
- When using a vacuum gauge, never force the hose onto a connector that is too large. Use a step-down adapter for adjustment. Once the hose has been stretched, it may leak air.
(m) Installation and removal of vacuum hose:
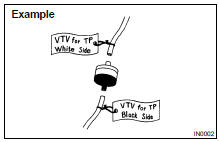
- When disconnecting vacuum hoses, use tags to identify how they should be reconnected to.
- After completing a job, double check that the vacuum hoses are properly connected. A label under the hood shows the proper layout.
(n) Bleeding of hydraulic brake booster system When repairing the hydraulic brake booster or ABS, bleeding the air out of the hydraulic brake booster ( BR-4 ).
(o) Unless otherwise stated, all resistance is measured at an ambient temperature of 20C (68F). Because the resistance may be outside specifications if measured at high temperatures immediately after the vehicle has been running, measurement should be made when the engine has cooled down.
General information
Vehicle lift and support locations
Toyota Land Cruiser Service Manual
Categories
