 Toyota Land Cruiser Service ManualAir conditioning » Front cooling unit
Disassembly
Disassembly
1. REMOVE EVAPORATOR
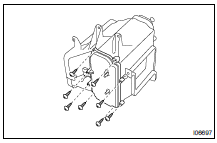
(a) Disconnect the connector clamp.
(b) Remove the 8 screws and No. 1 cooler cover.
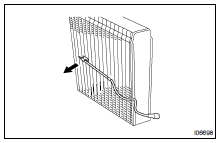
(c) Pull out the evaporator
HINT: At the time of reassembly, if evaporator is replaced, add compressor oil to the evaporator.
Add: 40 cc (1.4 fl.oz.)
Compressor oil: ND-OIL 8 or equivalent
2. PULL OUT EVAPORATOR TEMPERATURE SENSOR FROM EVAPORATOR
3. REMOVE EXPANSION VALVE
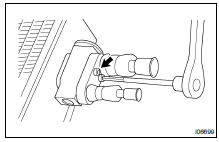
(a) Remove the grommet.
(b) Pry out the packing.
HINT: At the time of reassembly, do not reuse the packing.
(c) Using a hexagon wrench (5.0 mm, 0.20 in.), remove the 2 bolts and separate the expansion valve, tube and evaporator.
Torque: 3.4 N·m (35 kgf·cm, 30 in.·lbf)
NOTICE: Cap the open fittings immediately to keep moisture or dirt out of the system.
HINT: At the time of reassembly, lubricate 4 new O-rings with compressor oil and install them in the tube.
4. REMOVE DRAIN HOSE
INSTALLATION
Installation is in the reverse of removal (AC-24 ).
REASSEMBLY
Reassembly is in the reverse of disassembly (AC-26 ).
Disassembly
Removal
Toyota Land Cruiser Service Manual
Categories
