 Toyota Land Cruiser Service ManualCharging
Charging system
Charging system
ON-VEHICLE INSPECTION
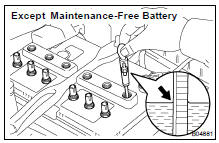
1. CHECK BATTERY ELECTROLYTE LEVEL
Check the electrolyte quantity of each cell.
Maintenance-Free Battery: If under the lower level, replace the battery (or add distilled water if possible). and check the charging system.
Except Maintenance-Free Battery: If under the lower level, add distilled water.
2. Except Maintenance-Free Battery: CHECK BATTERY SPECIFIC GRAVITY
Check the specific gravity of each cell.
Standard specific gravity: 1.25 - 1.29 at 20C (68F)
If the specific gravity is less than specification, charge the battery.
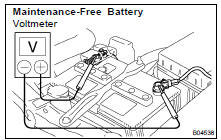
3. Maintenance-Free Battery: CHECK BATTERY VOLTAGE
(a) After having driven the vehicle and in the case that 20 minutes have not passed after having stopped the engine, turn the ignition switch ON and turn on the electrical system (headlight, blower motor, rear defogger etc.) for 60 seconds to remove the surface charge.
(b) Turn the ignition switch OFF and turn off the electrical systems.
(c) Measure the battery voltage between the negative (-) and positive (+) terminals of the battery.
Standard voltage: 12.5 - 12.9 V at 20C (68F)
If the voltage is less than specification, charge the battery.
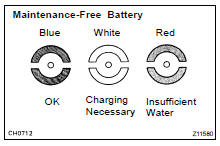
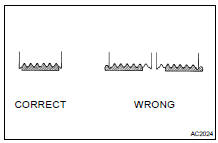
HINT: Check the indicator as shown in the illustration.
4. CHECK BATTERY TERMINALS, FUSIBLE LINK AND FUSES
(a) Check that the battery terminals are not loose or corroded.
(b) Check the fusible link and fuses for continuity.
5. INSPECT DRIVE BELT
HINT: A belt tensioner is used, so checking the belt tension is not necessary.
(a) Visually check the drive belt for excessive wear, frayed cords etc.
If necessary, replace the drive belt.
HINT:
- Cracks on the rib side of a drive belt are considered acceptable.
If the drive belt has chunks missing from the ribs, it should be replaced.
- The drive belt tension can be released by turning the belt tensioner counterclockwise. The pulley bolt for the belt tensioner has a left-hand thread.

(b) Check the belt tensioner operation.
- Check that the belt tensioner moves downward when the drive belt is pressed down at the points indicated in the illustration with approx. 98 N (10 kgf, 22.0 lbf) of force.
- Check the alignment of the belt tensioner pulley to make sure the drive belt has not slipped off the pulley.
If necessary, replace the belt tensioner.
- Check that the arrow mark on the belt tensioner falls within area A of the scale.
If it is outside area A, replace the drive belt.
HINT:
- When a new belt is installed, it should lie within area B. If not, the drive belt is not correct.
- After installing a belt, check that it fits properly in the ribbed grooves.
- Check by hand to confirm that the belt has not slipped out of the groove on the bottom of the pulley.
6. REMOVE ENGINE UNDER COVER NO.1
7. VISUALLY CHECK GENERATOR WIRING AND LISTEN FOR ABNORMAL NOISES
(a) Check that the wiring is in good condition.
(b) Check that there is no abnormal noise from the generator while the engine is running.
8. CHECK CHARGE WARNING LIGHT CIRCUIT
(a) Warm up the engine and then turn it off.
(b) Switch off all accessories.
(c) Turn the ignition switch ON, and check that the charge warning light is lit.
(d) Start the engine, and check that the light goes off.
If the light does not go off as specified, troubleshoot the charge light circuit.
9. INSPECT CHARGING CIRCUIT WITHOUT LOAD
HINT: If a battery/generator tester is available, connect the tester to the charging circuit as per manufacturer's instructions.
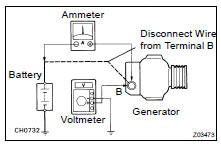
(a) If a tester is not available, connect a voltmeter and ammeter to the charging circuit as follows:
- Disconnect the wire from terminal B of the generator, and connect it to the negative (-) tester probe of the ammeter.
- Connect the positive (+) tester probe of the ammeter to terminal B of the generator.
- Connect the positive (+) tester probe of the voltmeter to terminal B of the generator.
- Ground the negative (-) tester probe of the voltmeter.
(b) Check the charging circuit as follows: With the engine running from idling to 2,000 rpm, check the reading on the ammeter and voltmeter.
Standard amperage: 10 A or less Standard voltage: 13.2 - 14.8 V
If the value is not specified, check the generator.
10. INSPECT CHARGING CIRCUIT WITH LOAD
(a) With the engine running at 2,000 rpm, turn on the high beam headlights and place the heater blower switch at HI.
(b) Check the reading on the ammeter.
Standard amperage: 30 A or more
If the ammeter reading is less than the standard amperage, repair the generator.
HINT: If the battery is fully charged, the indication will sometimes be less than standard amperage.
11. REINSTALL ENGINE UNDER COVER NO.1
PRECAUTION
- Check that the battery cables are connected to the correct terminals.
- Disconnect the battery cables when the battery is given a quick charge.
- Do not perform tests with a high voltage insulation resistance tester.
- Never disconnect the battery while the engine is running.
Charging system
Generator
Toyota Land Cruiser Service Manual
Categories
