 Toyota Land Cruiser Service ManualBody Mechanical
Back door glass
Back door glass
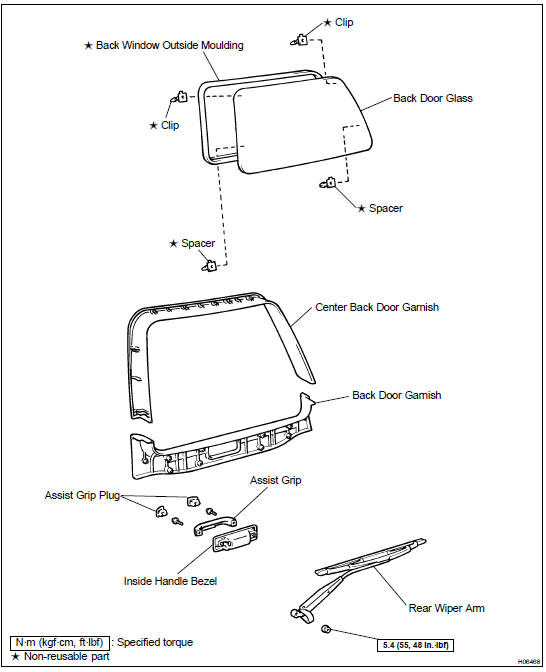
INSTALLATION
1. CLEAN AND SHAPE CONTACT SURFACE OF DOOR PANEL

(a) Using a knife, cut away any rough areas on the door panel.
HINT: Leave as much of the adhesive on the door panel as possible.
(b) Clean the cutting surface of the adhesive with a piece of shop rag saturated in cleaner.
HINT: Even if all the adhesive has been removed, clean the door panel.
2. CLEAN REMOVED GLASS

(a) Remove the damaged clips and spacers.
(b) Using a scraper, remove the adhesive sticking to the glass.
(c) Clean the glass with cleaner.
NOTICE: Do not touch the glass after cleaning it.
3. INSTALL NEW CLIPS AND SPACERS
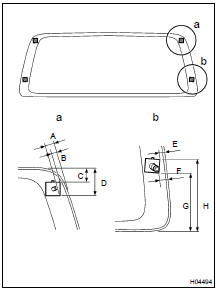
Install new clips and spacers onto the glass as shown in the illustration.
A: 24.3 mm (0.957 in.)
B: 18.6 mm (0.732 in.)
C: 33.1 mm (1.303 in.)
D: 52.8 mm (2.079 in.)
E: 14.4 mm (0.567 in.)
F: 18.0 mm (0.709 in.)
G: 156.6 mm (6.165 in.)
H: 176.8 mm (6.961 in.)
4. INSTALL BACK WINDOW MOULDING
Install a new back window moulding as shown in the illustration.
NOTICE: Do not touch the glass face after cleaning it.
5. COAT CONTACT SURFACE OF DOOR PANEL WITH PRIMER "M"
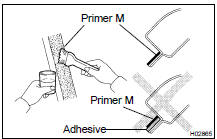
Using a brush, coat Primer M to the exposed part of door panel on the vehicle side.
NOTICE:
- Let the primer coating dry for 3 minutes or more.
- Do not coat Primer M to the adhesive.
- Do not keep any of the opened Primer M for later use.
6. COAT CONTACT SURFACE OF GLASS WITH PRIMER "G"
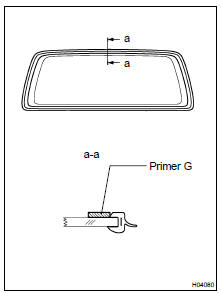
(a) Using a brush or sponge, coat the edge of the glass and contact surface with Primer G.
(b) When the primer coated wrongly to the area other than the specified, wipe it off with a clean shop rag before the primer dries.
NOTICE:
- Let the primer coating dry for 3 minutes or more.
- Do not keep any of the opened Primer G for later use.
7. APPLY ADHESIVE
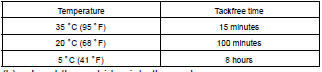
(a) Cut off the tip of the cartridge nozzle.
HINT: After cutting off the tip, use all adhesive within the time described in the table below.
(b) Load the cartridge into the sealer gun.
(c) Coat the glass with adhesive, as shown in the illustration.
A: 8.0 mm (0.315 in.) B: 12.0 mm (0.472 in.)
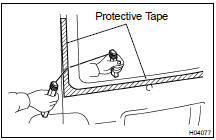
8. INSTALL BACK DOOR GLASS
(a) Install the glass to the body.
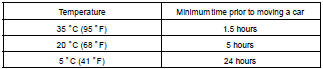
(b) Hold back window glass in place securely with protective tape or equivalent until the adhesive hardens.
NOTICE: Take care not to drive the vehicle during the time described in the table below.
9. INSPECT FOR LEAKS AND REPAIR
(a) Conduct a leak test after the hardening time has elapsed.
(b) Seal any leak with sealant.
Part No. 08833-00030 or equivalent.
10. INSTALL REAR WIPER ARM ( BO-42 )
11. INSTALL BACK DOOR GARNISH
12. INSTALL CENTER BACK DOOR GARNISH
13. INSTALL INSIDE HANDLE BEZEL
14. INSTALL ASSIST GRIP
Install the assist grip with the 2 screws, then install 2 assist grip plugs.
Removal
1. REMOVE ASSIST GRIP
(a) Using a screwdriver, remove the 2 assist grip plugs.
HINT: Tape the screwdriver tip before use.
(b) Remove the 2 screws and assist grip.
2. REMOVE INSIDE HANDLE BEZEL
3. REMOVE CENTER BACK DOOR GARNISH
Using a screwdriver, remove the center back door garnish.
HINT: Tape the screwdriver tip before use.
4. REMOVE BACK DOOR GARNISH
Using a screwdriver, remove the back door garnish.
HINT: Tape the screwdriver tip before use.
5. REMOVE REAR WIPER ARM ( BO-38 )
6. REMOVE OUTSIDE BACK WINDOW MOULDING

Using a knife, cut off the moulding as shown in the illustration.
NOTICE: Do not damage the body with the knife.
7. REMOVE BACK DOOR GLASS
(a) Disconnect the connector.
(b) Push piano wire through between the body and glass from the interior.
(c) Tie both wire ends to wooden blocks or similar objects.
HINT: Apply protective tape to the outer surface to keep the surface from being scratched.
NOTICE: When separating the glass, take care not to damage the paint and exterior ornaments.
(d) Cut the adhesive by pulling the piano wire around it.
(e) Remove the glass.
NOTICE: Leave as much of the adhesive on the body as possible when cutting off the glass.
Back door glass
Back door stay
Body outside moulding
Clip
Front bumper
Front seat
Front wiper and washer
Hood
Hood support
Instrument panel
Lower back door
Quarter window glass
Roof drip side finish moulding
Rear bumper
Rear door
Rear No.1 Seat (LH)
Rear No.1 Seat (RH)
Rear No.2 Seat
Roof headlining
Rear wiper and washer
Seat belt pretensioner
Seat belt pretensioner
Replacement
Seat belt
Sliding roof
SRS airbag
Upper back door
Windshield
Toyota Land Cruiser Service Manual
Categories
